It’s soon time to say goodbye

I’ve started the Smart Office blog back in 2011. The reason behind the blog was simple, but not easy. I wanted to share knowledge and examples and at the time there was no offical community (forum) that could be used. A lot of team members have contributed to the blog, most of them are still at Infor, building great products. The team that worked on Smart Office has since then worked on: Infor Document Manager, M3, Mingle Homepages, Backend as Service (BaaS) and Infor OS Portal.

The prime time for the blog with the most number of visitors was during 2015-2016, today there are 2 600 views a month, even though we haven’t posted any new posts in quite some time.

After more than 12 years it’s soon time to say good bye. At the turn of the year this blog will be discontinued, removed, a thing of the past. I would like to thank all contributors, especially norpe, Vince, Peter, Sofi and Rickard and I recommend the Infor Community for Developers for technical questions on our products.

Support Added for Edge Browser Control in Infor Smart Office

Displaying web content in Smart Office has always relied on a .NET control which uses the Internet Explorer rendering engine. But with support ending for IE 11, Microsoft has provided an alternative control based on the Edge Chromium browser, their preferred browser going forward. In Smart Office we will support this new control with 2 new profile settings starting with Hot Fix 56 (version 10.2.1.0.465).

Profile Settings

To enable the Edge browser control, launch the Profile Editor under ISO Administration Tools and select the Smart Client component in the desired profile. In Basic mode check the associated check box (or enter True in Advanced mode). Later should you wish to disable the control, simply uncheck the checkbox (or enter False in Advanced mode).

If the Edge browser control is enabled, you have the option to only use a new Edge Browser Widget (see below) by checking the second new setting, Use Edge Browser Widget Only. If the Edge control is not enabled, this setting is ignored.

Enable Edge browser control in Profile Editor

Even with the control enabled, those client machines without the required runtime (see below), will see no difference in behavior or features in Smart Office. The MangoClient.log will contain entries showing the state of the control.

  INFO Mango.UI.Utils.WebView2Util..cctor – Edge browser control is enabled in Test Profile
INFO Mango.UI.Utils.WebView2Util.GetInstallInfo – Edge runtime is installed, version… INFO Mango.UI.Utils.WebView2Util..cctor – Both IE and Edge browsers widgets are available  
MangoClient.log entries


If enabled and the runtime is installed all web content rendered within Smart Office (except the existing Web Browser widget) will use the Edge render engine. For Lawson/S3 clients, this includes content launched with the “net://auth” protocol. No option is provided to override that behavior on a case by case basis.

Also, if the Edge control is being used, the Smart Office setting for Browser emulation will only apply to the existing Web Browser widget. As before, there are still various options to launch web content in the system (external) browser.

New Widget

If the Edge control is enabled in the profile and the runtime installed on the client, in addition to rendering a shortcut to web content in a window hosting Edge, a new widget is available in the widget library: Web Browser – Edge. The existing Web Browser widget will still be available to render content using the IE render engine unless the new profile setting, Use Edge Browser Widget Only is set to True. If this is set to True, any IE widgets previously saved to a canvas will be rendered with the Edge browser widget.

New widget using Edge control
Using new Edge Browser widget only

Runtime Requirement

There is a separate installation requirement for the control, referred to as Microsoft Edge WebView 2. However, recent Windows or Office updates may already have installed it on some client machines. Microsoft announced starting on April 1, 2021, the WebView2 Runtime will be installed on devices running Windows and that have Version 2101 or later of Microsoft 365 Apps installed. Other reports suggest that it may be auto installed by other updates. (The runtime is required for certain new Office apps features.)

You can determine if the runtime is installed by opening the Windows Settings, searching for Apps & Features, and entering WebView2 in the search box.  If you discover that that runtime is not installed, a download is available from Microsoft here*. If the runtime is displayed, you can click it to see the version as shown below.

WebView2 Runtime found in Apps & Features of Windows 10

Note

  • WebView2 Runtime doesn’t install Microsoft Edge (full browser) on the device and doesn’t require Microsoft Edge to be installed on the device.
  • When WebView2 Runtime is installed on the device, no change is made to the user’s default browser selection.

Written by: Vince

Closing H5 Scripting and Jscript Feedback for comments

This blog is for Smart Office developers by Smart Office developers and I started it back in 2012. We continue to maintaining Smart Office but during the last few years we have developed Ming.le Homepages and previously the H5 SDK and now we are working on some new products. We are today not that involved in the M3 development and we thank Reggie for answering a lot of H5 related questions on this site. We continue to support Smart Office and this blog is a great source of information and a nice channel for publishing Smart Office related information, but the option for commenting on H5 Scripting and JScript comments have been closed.

We encurage you to use the M3 development at Infor Community for questions, or the H5 SDK git for development of web applications in H5, but please try and avoid posting at multiple locations at the same time.

Establishing Mutual Trust

The Smart Office client is signed with a code-signing certificate for safety, that certificate needs to be renewed every few years like an Id-card. We just did this for the upcoming release (HF55) and due to some changed business related values in the new certificate you may experience an inconvenient Microsoft Defender SmartScreen dialog for a short period of time.

Microsoft has a SmartScreen feature that keeps track of a signed applications reputation for establishing a rapport. The new certificate categorize Smart Office as a brand new application not trusted by Microsoft Defender SmartScreen. Until Smart Office has earned its reputation you will see the following dialog when an install or update of the client is started.

In order to continue with the install or update you must click the link More info and proceed to the following dialog. Ensure that the publisher is Infor and that the App file is MangoClient.exe (Smart Office), then press the button Run anyway.

When Microsoft Defender SmartScreen has registered a certain amount of likes in form of users pressing the Run anyway button it will be accepted as a known application once more.

.Net Framework 4.8 Required

Smart Office 10.2.1.0.452 start the new year of 2021 to target Microsoft .Net Framework 4.8, the final version from Microsoft of the classic framework. It will be supported and delivered with future Windows versions. The .Net Framework 4.8 has been part of Windows 10 since v1903 build 18362.

Check .Net Version before next upgrade

Smart Office client has informed about the upcoming change when running on local machines lacking 4.8. The warning has been added in the Smart Office log viewer and log file since build 434 and in the login dialog since build 440. We recommend a version check before doing the next upgrade to the latest Smart Office.
Here are three methods how to check the client .Net version;

1 – Version check in Smart Office client

Launch Smart Office client and its Log Viewer from the About dialog or use the shortcut internal://log.
On the right-hand side in the Log Viewer is the expandable fact-pane, take a look under the Environment header where you see the .Net Framework version listed, or search for the phrase Detected setup in the log.

Smart Office log viewer facts-pane

2 – Manual check in Windows Registry

The Windows registry can be examined using the Windows tool regedt32. For documentation details how the version is specified in the registry follow this link.

The short version is that you launch regedt32 and navigate to the location:

HKEY_LOCAL_MACHINE\SOFTWARE\Microsoft\NET Framework Setup\NDP\v4\Full

The Release value should be equal to or higher than: 528040 (0x00080EA8)
and Version should begin with 4.8.x

3 – Powershell Script check for in Windows Registry (works remote)

Here is an example of a Powershell script that check the listed computers if an upgrade is required to .Net 4.8. The script function take a list of computer names and perform a (remote) check of the registry (if the user is authorized to do so).
The function call below checks the local computer where the script is running.

function CheckDotNet48Framework($computerName)
{
   $dotNet4Registry = 'SOFTWARE\Microsoft\NET Framework Setup\NDP\v4\Full'
   foreach($computer in $ComputerName)
   {
      if($regKey = [Microsoft.Win32.RegistryKey]::
      OpenRemoteBaseKey('LocalMachine', $computer))
      {
        if ($net4RegKey = $regKey.OpenSubKey("$dotNet4Registry"))
        {
            $net4Release = $net4RegKey.GetValue('Release')
            $net4Version = $net4RegKey.GetValue('Version')
            New-Object -TypeName PSObject -Property ([ordered]@{
                    Computer_Name = $computer
                    Net_Version = $net4Version
                    Net_Build = $net4Release
                    Require_48_Upgrade = $net4Release -lt 528040
            })
         }
      }
   }
}

CheckDotNet48Framework($env:COMPUTERNAME)
Output running script on a local machine with .Net 4.8 Framework

Troubleshoot an Install Issue

If the local machine lacks .Net 4.8 when the Smart Office ClickOnce installation is launched, the following dialog will appear to request an install of .Net Framework v4.8.


The Smart Office ClickOnce upgrade should run without any issues if 4.8 is installed on the local machine, but in rare cases it fails and the cause is often a Windows cache.

If the Cannot Start Application dialog appears, run the following command to clear the online App cache.

rundll32 %windir%\system32\dfshim.dll CleanOnlineAppCache

Try to launch Smart Office again. In most cases ClickOnce should be back on track, upgrade and launch Smart Office.

Note: The Cannot Start Application dialog appear before Smart Office has started and is part of the Windows ClickOnce feature. The Details… button will show you some details of the ClickOnce installation log.

The Install Issue Persists

If the cache is cleared but the issue isn’t resolved, the recommendation is to capture a verbose ClickOnce installation log before you uninstall and reinstall the Smart Office client, in case further support is needed later on.

There is a Windows Registry entry that will enable Verbose log and specify location for the log file. Create an EnableClickOnceVerboseLog.reg file with the following content to run and activate the ClickOnce verbose log.

Windows Registry Editor Version 5.00

[HKEY_CURRENT_USER\Software\Classes\Software\Microsoft\Windows\CurrentVersion\Deployment]
"LogFilePath"="C:\ClickOnce.log"
"LogVerbosityLevel"="1"

The corresponding DisableClickOnceVerboseLog.reg file to de-activate it.

Windows Registry Editor Version 5.00
 [HKEY_CURRENT_USER\Software\Classes\Software\Microsoft\Windows\CurrentVersion\Deployment]
 "LogFilePath"=-
 "LogVerbosityLevel"=-

To fix the issue in Windows, uninstall the Smart Office client in the Windows Control Panel and click on the link at the installation point to re-install it once again. There is an older post about using Powershell script to uninstall Smart Office here.

1) Uninstall Infor Smart Office in Windows Settings under Apps & Features

2) Delete “2.0” folder located at
C:\Users\<ReplaceWithWindowsUserID>\AppData\Local\Apps\2.0
    (Hidden folder, select Hidden Items under File Explorer View Toolbar)

Note: Other .Net Framework applications also store transient data under this folder!
If you have concerns for the data in other applications it’s
recommended only to delete app folders and tree branches that contain
MangoClient* files (Smart Office).

A New Year in the Calendar

Is the week number 52, 53 or 1 not where you expect it to be in the calendar view?

When you’re in the transition between the old and the new year it may be relevant for some Smart Office users to talk about the visible week number in the date picker or the calendar control.

The weeks in the Gregorian calendar are numbered from week 1 to 52 but some years week 53 will appear. If the year starts on a Thursday or is a leap year that starts on a Wednesday (2020) it will have 53 weeks. This is the case in some European and Asian countries following the ISO-8601 standard but not for the United States, Canada, Australia and New Zealand. The ISO-8601 week 1 of the year 2021 will correspond to week 2 in the United States for example.

The week number is calculated based on the first day of the week and the cultural calendar week rule. In Smart Office this information is either fetched from the Windows Region settings or Smart Office itself depending on the Smart Office settings.

The relevant settings are found in the Smart Office Settings Editor (administration tool) under the Mango.UI section:

First day of week setting

The option ‘Use client settings‘ will determine the first day of the week by Windows cultural and regional setting.

The option ‘Monday‘ will set the first day of the week by the ISO-8601 standard (Monday) and use the ‘First four day week‘ Calendar Week rule. The Windows cultural settings are ignored when calculating the week.

UI element language setting

The option ‘Windows region setting‘ will determine the Calendar Week rule by the Windows regional format setting, unless the ISO standard option ‘Monday‘ is selected as ‘First day of week‘ and then the ‘First four day week’ rule is used.

The option ‘Smart Office language‘ will derive the Calendar Week rule from the current user language set in Smart Office.

ClickOnce and Microsoft Edge (Chromium)

The ClickOnce installation behavior recently changed when Microsoft introduced the new Microsoft Edge, based on the Chromium open source project.

The new Microsoft Edge has ClickOnce support from v 77 and it it’s enabled by default from v 87. There is an older post about how to enable it here.

Browse to the following link in Edge to see the current version.

edge://version/

New Behavior

Launching Smart Office from a ClickOnce installation point link or performing a logoff (restart) from within Smart Office is now disrupted by the following dialog due to the changed security implementation:

Press Open to continue with the ClickOnce launch process as it was before.

The dialog will not appear if Smart Office is launched from the Windows Start Menu or the Start Menu link as a shortcut on the Windows Desktop.

The Logoff button can be locked in Shutdown mode to avoid this issue altogether.
Instead of Logoff, a Shutdown and then Launch from Windows Start Menu is performed by the user.

Use the Admin tool Import/Export Manager to change the setting ‘Shutdown’ in Mango.UI.xml to be readonly with default value true.

<mp:Property Name="ShutDown" ReadOnly="True">
   <mp:DefaultValue>True</mp:DefaultValue> 
   <mp:Value /> 
</mp:Property>

It will result in the following Smart Office Canvas Header

You can read more about ClickOnce and DirectInvoke in the Microsoft document here.

Lawson Global and Role Defaults

A long-requested feature, the ability to set global default values for Infor Lawson applications within Smart Office, was recently made available with HF 47, version 10.2.1.0.408. As an added feature, default values can also be set at the Role level, which would take precedence over global values.

Users with Portal admin access can define global values by launching the ‘Lawson Global Values’ link in the Navigator widget under Infor Lawson => Lawson Administration. Role level defaults are set in the Role Manager, accessed from a new ‘Defaults’ button on the General tab.

GlobalDefaultsLawson Global Defaults window

Default values depend on associating values with Lawson key numbers, which are in fact 2 or 3-character alphanumeric values. Key numbers are associated with form fields, with the most common key number being “01” which is generally associated with company fields. If a field has a key number, it can be seen in the field info popup (Ctrl+Alt+O) as ‘Knb’.

Due to the large number of applications developed over many years, key numbers are not guaranteed to be unique across all screens and special handling may be defined. While testing new defaults, it may be necessary to list one or more tokens to be excluded or included when evaluating a form’s default values. If no tokens are listed, the value will be applied where ever the key number is encountered.

When defining defaults, a few of the more common key numbers are listed and can be selected from a popup menu by clicking the ‘…’ button to the right of the key number field.

KeyValueNumber
Key number value displayed in field info popup

CommonKeyNumber
Common Key number popup

One additional consideration when defining defaults is whether to allow role overrides. For example, if your organization has setup different roles to handle different groups of customers or vendors, this may be desirable. However, if a override is not allowed for a key number, you will see the message below when entering it in Role maintenance.

NotAllowed
An attempt to override a key number not allowed


Thanks Vince for this information.

ClickOnce Uninstall Script

There’s a previous post Sound of a Silent Install how to perform a silent install in virtual desktop environments using the Windows installer (MSI) version.

The conventional way to install Infor Smart Office on client machines is to use Microsoft ClickOnce network deployment to get an isolated, secure, self-updating application that can be installed and run with minimal user interaction.

To Uninstall a ClickOnce application require the launch of the uninstall dialog and some user interaction. To perform uninstall on many client machines can become tedious so here is a Powershell script example that performs the task.

The script use the application display name from Windows Start menu to find the ClickOnce uninstall string in the Windows Registry. It launches the ClickOnce uninstall dialog, selects the “Remove the application from this computer” option and press the OK button. This example has been tested on Windows v10.0.17763 and there’s no guarantee it will work on every Windows version.

<# Set $ISODisplayName to the visible name of the application in the Windows Start menu #>
$ISODisplayName = "Infor Smart Office - DEV"

<# Get uninstallable ClickOnce applications #>
$InstalledApplicationNotMSI = Get-ChildItem HKCU:\Software\Microsoft\Windows\CurrentVersion\Uninstall | foreach-object {Get-ItemProperty $_.PsPath}

<# Find uninstall string for named ClickOnce application #>
<# The name is the display name visible in the Windows Start Menu #>
$UninstallString = $InstalledApplicationNotMSI | ? { $_.displayname -match $ISODisplayName } | select UninstallString 
$selectedUninstallString = $UninstallString.UninstallString

<# Launch ClickOnce uninstall command #>
$wshell.run("cmd /c $selectedUninstallString")

<# Wait 7 seconds for uninstall dialog to appear #>
Start-Sleep 7

<# Move focus and Select option "Remove the Application from this computer" #>
<# Key specifications: https://docs.microsoft.com/en-us/dotnet/api/system.windows.forms.sendkeys?view=netframework-4.7.2 #>
$wshell.sendkeys("{TAB}")
$wshell.sendkeys("{DOWN}")

<# Press the OK button #>
$wshell.sendkeys("`"OK`"~")


Microsoft Edge Chromium and ClickOnce

The new Microsoft Edge Chromium browser doesn’t provide native support for ClickOnce as of version 81.0.416.6.

It will by default NOT work to launch a Smart Office ClickOnce install point link in Edge Chromium.

To enable ClickOnce support in Edge Chromium:

  1. Enter edge://flags link in Edge Chromium browser.
  2. Scroll down to ClickOnce Support setting and select ‘Enable’ from the dropdown list.
  3. Restart the browser.
Note: This setting will be overridden if your organization configures the 
"Allow users to open files using the ClickOnce protocol" policy. – Windows

The Edge Chromium will always prompt the user before launch of a 
ClickOnce link because Chromium doesn't rely on the Windows Security Zones.

ScriptUtil.LoadAssemblyFromUrl() is Obsolete

The ScriptUtil.LoadAssemblyFromUrl method was marked obsolete in v10.2.1.0 HF32. A workaround for M3 scripts using the method is to replace with the following code:

var assembly = Assembly.Load(WebReader.GetRequestBinary(url));

In between version 10.2.1.0.333 (HF32) and 10.2.1.0.385 (HF42) the obsolete method will
fail in silence and just return null.

This has been changed in 10.2.1.0.389 (HF43) and an InvalidOperationException will be thrown when calling the method.

JSON support in REST data service – Part III

Create, Update or Delete a User

In the third post we continue to use the fake online REST service to add operations to create, update and delete a user.

Mashup_REST_JSON_DELPATCHPUT

We add three DataOperation declarations to create, update and delete a user and set the OutputType to be JSON to easily show the request response in a textbox as a text string. The online service will return a correct response but no changes will actually be done in the service database, this is just for testing purposes.

<mashup:DataOperation Name="CreateUserPost">
    <mashup:DataParameter Key="REST.BaseAddress" Value="https://jsonplaceholder.typicode.com/users" />
    <mashup:DataParameter Key="REST.InputJsonTemplate" Value="{StaticResource PostTemplate}" />
    <mashup:DataParameter Key="REST.AcceptHeader" Value="application/json" />
    <mashup:DataParameter Key="REST.HttpMethod" Value="POST" />
    <mashup:DataParameter Key="REST.InputType" Value="json" />
    <mashup:DataParameter Key="REST.OutputType" Value="application/json" />
</mashup:DataOperation>
<mashup:DataOperation Name="UpdateUserPost">
    <mashup:DataParameter Key="REST.BaseAddress" Value="https://jsonplaceholder.typicode.com/users/{id}" />    
    <mashup:DataParameter Key="REST.AcceptHeader" Value="application/json" />
    <mashup:DataParameter Key="REST.HttpMethod" Value="PUT" />
    <mashup:DataParameter Key="REST.InputType" Value="json" />
    <mashup:DataParameter Key="REST.OutputType" Value="application/json" />
</mashup:DataOperation>
<mashup:DataOperation Name="DeleteUser">
    <mashup:DataParameter Key="REST.BaseAddress" Value="https://jsonplaceholder.typicode.com/posts/{id}" />
    <mashup:DataParameter Key="REST.AcceptHeader" Value="application/json" />
    <mashup:DataParameter Key="REST.HttpMethod" Value="DELETE" />
    <mashup:DataParameter Key="REST.OutputType" Value="application/json" />
</mashup:DataOperation>

We also add a button for each operation with a trigger event. All the property values for the current item the DataPanel will be added in the request body, so just declare the Parameter bindings for values that may change.

<Button DockPanel.Dock="Right" HorizontalAlignment="Right" Margin="5" Content="Update User">
   <Button.CommandParameter>
      <mashup:Events>
         <mashup:Event TargetName="UserDetails" SourceEventName="Click" TargetEventName="UpdateUserPost">
         <mashup:Parameter TargetKey="email" Value="{Binding ElementName=CEmail, Path=Text}" Type="String" />
         <mashup:Parameter TargetKey="website" Value="{Binding ElementName=CWebsite, Path=Text}" Type="String" />
         <mashup:Parameter TargetKey="phone" Value="{Binding ElementName=CPhone, Path=Text}" Type="String" />
         </mashup:Event>
      </mashup:Events>
   </Button.CommandParameter>
</Button>


Here is the Mashup code if you would like to try it out.

<Grid Margin="15,10,15,15" xmlns="http://schemas.microsoft.com/winfx/2006/xaml/presentation" xmlns:x="http://schemas.microsoft.com/winfx/2006/xaml" xmlns:ui="clr-namespace:Mango.UI.Controls;assembly=Mango.UI" xmlns:mashup="clr-namespace:Mango.UI.Services.Mashup;assembly=Mango.UI" xmlns:m3="clr-namespace:MForms.Mashup;assembly=MForms" xmlns:sys="clr-namespace:System;assembly=mscorlib">
   <Grid.RowDefinitions>
      <RowDefinition Height="1*" />
      <RowDefinition Height="Auto" />
      <RowDefinition Height="1*" />
   </Grid.RowDefinitions>
   <Grid.ColumnDefinitions>
      <ColumnDefinition Width="1*" />
      <ColumnDefinition Width="10" />
      <ColumnDefinition Width="1*" />
   </Grid.ColumnDefinitions>
   <Grid.Resources>
      <x:String x:Key="PostTemplate"><![CDATA[      
               { 
                 "name": "{name}",
                 "username": "{username}",
                 "email": "{email}",
                 "address": {
                    "street": "{street}",
                    "suite": "{suite}",
                    "city": "{city}",
                    "zipcode": "{zipcode}",
                    "geo": {
                       "lat": "0.0",
                       "lng": "0.0"
                    }
                 },
                 "phone": "{phone}",
                 "website": "{website}",
                 "company": {
                    "name": "{companyName}",
                    "catchPhrase": "{companyCatchPhrase}",
                    "bs": "{companyBs}"
                 }                 
               }
            ]]></x:String>
   </Grid.Resources>
   <mashup:DataListPanel DockPanel.Dock="Top" Name="UsersList" Grid.Column="0" Grid.Row="0" Grid.RowSpan="3">
      <mashup:DataListPanel.DataService>
         <mashup:DataService Type="REST">
            <mashup:DataService.Operations>
               <mashup:DataOperation Name="List">
                  <mashup:DataParameter Key="REST.BaseAddress" Value="https://jsonplaceholder.typicode.com/users/" />
                  <mashup:DataParameter Key="REST.OutputType" Value="DataItem" />
                  <mashup:DataParameter Key="REST.AcceptHeader" Value="application/json" />
               </mashup:DataOperation>
            </mashup:DataService.Operations>
         </mashup:DataService>
      </mashup:DataListPanel.DataService>
      <mashup:DataListPanel.Events>
         <mashup:Events>
            <mashup:Event SourceEventName="Startup" TargetEventName="List" />
            <mashup:Event SourceName="UsersList" TargetName="UserDetails" SourceEventName="CurrentItemChanged" TargetEventName="Get">
               <mashup:Parameter SourceKey="id" TargetKey="userId" Type="Numeric" />
            </mashup:Event>
         </mashup:Events>
      </mashup:DataListPanel.Events>
      <DockPanel LastChildFill="False">
         <ListView DockPanel.Dock="Top" Name="ListViewCompany" ItemsSource="{Binding Items}" Style="{DynamicResource styleListView}" ItemContainerStyle="{DynamicResource styleListViewItem}">
            <ListView.View>
               <GridView ColumnHeaderContainerStyle="{DynamicResource styleGridViewColumnHeader}">
                  <GridView.Columns>
                     <GridViewColumn Header="Company" DisplayMemberBinding="{Binding [company].[name]}" />
                     <GridViewColumn Header="City" DisplayMemberBinding="{Binding [address].[city]}" />
                     <GridViewColumn Header="Name" DisplayMemberBinding="{Binding [name]}" />
                     <GridViewColumn Header="Email" DisplayMemberBinding="{Binding [email]}" />
                     <GridViewColumn Header="Longitude" DisplayMemberBinding="{Binding [address].[geo].[lng]}" />
                     <GridViewColumn Header="Longitude" DisplayMemberBinding="{Binding [address].[geo].[lng]}" />
                  </GridView.Columns>
               </GridView>
            </ListView.View>
         </ListView>
      </DockPanel>
   </mashup:DataListPanel>
   <mashup:DataPanel Grid.Row="0" Grid.Column="2" Grid.RowSpan="1" Name="UserDetails">
      <mashup:DataPanel.DataService>
         <mashup:DataService Type="REST">
            <mashup:DataService.Operations>
               <mashup:DataOperation Name="Get">
                  <mashup:DataParameter Key="REST.BaseAddress" Value="https://jsonplaceholder.typicode.com/users/{userId}" />
                  <mashup:DataParameter Key="REST.OutputType" Value="DataItem" />
                  <mashup:DataParameter Key="REST.AcceptHeader" Value="application/json" />
               </mashup:DataOperation>
               <mashup:DataOperation Name="CreateUserPost">
                  <mashup:DataParameter Key="REST.BaseAddress" Value="https://jsonplaceholder.typicode.com/users" />
                  <mashup:DataParameter Key="REST.InputJsonTemplate" Value="{StaticResource PostTemplate}" />
                  <mashup:DataParameter Key="REST.AcceptHeader" Value="application/json" />
                  <mashup:DataParameter Key="REST.HttpMethod" Value="POST" />
                  <mashup:DataParameter Key="REST.InputType" Value="json" />
                  <mashup:DataParameter Key="REST.OutputType" Value="application/json" />
               </mashup:DataOperation>
               <mashup:DataOperation Name="UpdateUserPost">
                  <mashup:DataParameter Key="REST.BaseAddress" Value="https://jsonplaceholder.typicode.com/users/{id}" />
                  <mashup:DataParameter Key="REST.AcceptHeader" Value="application/json" />
                  <mashup:DataParameter Key="REST.HttpMethod" Value="PUT" />
                  <mashup:DataParameter Key="REST.InputType" Value="json" />
                  <mashup:DataParameter Key="REST.OutputType" Value="application/json" />
               </mashup:DataOperation>
               <mashup:DataOperation Name="DeleteUser">
                  <mashup:DataParameter Key="REST.BaseAddress" Value="https://jsonplaceholder.typicode.com/posts/{id}" />
                  <mashup:DataParameter Key="REST.AcceptHeader" Value="application/json" />
                  <mashup:DataParameter Key="REST.HttpMethod" Value="DELETE" />
                  <mashup:DataParameter Key="REST.OutputType" Value="application/json" />
               </mashup:DataOperation>
            </mashup:DataService.Operations>
         </mashup:DataService>
      </mashup:DataPanel.DataService>
      <mashup:DataPanel.Events>
         <mashup:Events></mashup:Events>
      </mashup:DataPanel.Events>
      <Grid Margin="10,0,10,0">
         <Grid.RowDefinitions>
            <RowDefinition Height="50" />
            <RowDefinition Height="Auto" />
            <RowDefinition Height="0" />
            <RowDefinition Height="Auto" />
            <RowDefinition Height="0" />
            <RowDefinition Height="Auto" />
            <RowDefinition Height="0" />
            <RowDefinition Height="Auto" />
            <RowDefinition Height="0" />
            <RowDefinition Height="Auto" />
            <RowDefinition Height="24" />
            <RowDefinition Height="Auto" />
         </Grid.RowDefinitions>
         <DockPanel Grid.Row="1" LastChildFill="False">
            <TextBlock DockPanel.Dock="Left" Text="Company" Width="55" Margin="5" VerticalAlignment="Center" />
            <TextBox DockPanel.Dock="Left" Name="CCompany" Width="220" Margin="5" Text="{Binding [company].[name]}" />
         </DockPanel>
         <DockPanel Grid.Row="3">
            <TextBlock DockPanel.Dock="Left" Text="Name" Width="55" Margin="5" VerticalAlignment="Center" />
            <TextBox DockPanel.Dock="Left" Name="CName" Width="220" Margin="5" Text="{Binding [name]}" />
            <TextBlock DockPanel.Dock="Left" Text="UserName" Width="60" Margin="0,0,10,0" VerticalAlignment="Center" />
            <TextBox DockPanel.Dock="Left" Name="CUserName" Margin="5" Text="{Binding [username]}" />
         </DockPanel>
         <DockPanel Grid.Row="5">
            <TextBlock DockPanel.Dock="Left" Text="Email" Width="55" Margin="5" VerticalAlignment="Center" />
            <TextBox DockPanel.Dock="Left" Name="CEmail" Width="220" Margin="5" Text="{Binding [email]}" />
            <TextBlock DockPanel.Dock="Left" Text="Website" Width="60" Margin="0,0,10,0" VerticalAlignment="Center" />
            <TextBox DockPanel.Dock="Left" Name="CWebsite" Margin="5" Text="{Binding [website]}" />
         </DockPanel>
         <DockPanel Grid.Row="7" LastChildFill="False">
            <TextBlock DockPanel.Dock="Left" Text="Phone" Width="55" Margin="5" VerticalAlignment="Center" />
            <TextBox DockPanel.Dock="Left" Name="CPhone" Width="220" Margin="5" Text="{Binding [phone]}" />
         </DockPanel>
         <DockPanel Grid.Row="9">
            <TextBlock DockPanel.Dock="Left" Text="Catch" Width="55" Margin="5" VerticalAlignment="Center" />
            <TextBox DockPanel.Dock="Left" Name="CCatch" Width="220" Margin="5" Text="{Binding [company].[catchPhrase]}" />
            <TextBlock DockPanel.Dock="Left" Text="BS" Width="60" Margin="5" VerticalAlignment="Center" />
            <TextBox DockPanel.Dock="Left" Name="CBS" Margin="5" Text="{Binding [company].[bs]}" />
         </DockPanel>
         <DockPanel Grid.Row="11">
            <Button DockPanel.Dock="Right" HorizontalAlignment="Right" Margin="5" Content="Add User">
               <Button.CommandParameter>
                  <mashup:Events>
                     <mashup:Event TargetName="UserDetails" SourceEventName="Click" TargetEventName="CreateUserPost">
                        <mashup:Parameter TargetKey="name" Value="{Binding ElementName=CName, Path=Text}" Type="String" />
                        <mashup:Parameter TargetKey="companyName" Value="{Binding ElementName=CCompany, Path=Text}" Type="String" />
                        <mashup:Parameter TargetKey="userName" Value="{Binding ElementName=CUserName, Path=Text}" Type="String" />
                        <mashup:Parameter TargetKey="email" Value="{Binding ElementName=CEmail, Path=Text}" Type="String" />
                        <mashup:Parameter TargetKey="website" Value="{Binding ElementName=CWebsite, Path=Text}" Type="String" />
                        <mashup:Parameter TargetKey="phone" Value="{Binding ElementName=CPhone, Path=Text}" Type="String" />
                        <mashup:Parameter TargetKey="companyCatchPhrase" Value="{Binding ElementName=CCatch, Path=Text}" Type="String" />
                        <mashup:Parameter TargetKey="companyBs" Value="{Bindng ElementName=CBS, Path=Text}" Type="String" />
                     </mashup:Event>
                  </mashup:Events>
               </Button.CommandParameter>
            </Button>
            <Button DockPanel.Dock="Right" HorizontalAlignment="Right" Margin="5" Content="Update User">
               <Button.CommandParameter>
                  <mashup:Events>
                     <mashup:Event TargetName="UserDetails" SourceEventName="Click" TargetEventName="UpdateUserPost">
                        <mashup:Parameter TargetKey="email" Value="{Binding ElementName=CEmail, Path=Text}" Type="String" />
                        <mashup:Parameter TargetKey="website" Value="{Binding ElementName=CWebsite, Path=Text}" Type="String" />
                        <mashup:Parameter TargetKey="phone" Value="{Binding ElementName=CPhone, Path=Text}" Type="String" />
                     </mashup:Event>
                  </mashup:Events>
               </Button.CommandParameter>
            </Button>
            <Button DockPanel.Dock="Top" HorizontalAlignment="Right" Margin="5" Content="Delete User">
               <Button.CommandParameter>
                  <mashup:Events>
                     <mashup:Event TargetName="UserDetails" SourceEventName="Click" TargetEventName="DeleteUser">
                        <mashup:Parameter TargetKey="id" Value="{Binding ElementName=UsersList, Path=CurrentItem[id]}" />
                     </mashup:Event>
                  </mashup:Events>
               </Button.CommandParameter>
            </Button>
         </DockPanel>
      </Grid>
   </mashup:DataPanel>
   <DockPanel Grid.Row="1" Grid.Column="2" Grid.RowSpan="2" VerticalAlignment="Stretch">
      <TextBlock DockPanel.Dock="Top" Text="Server Response:" Width="140" Margin="5" VerticalAlignment="Top" HorizontalAlignment="Left" />
      <TextBox Name="ServerResponse" DockPanel.Dock="Top" Text="{Binding ElementName=UserDetails, Path=DataContext[json]}" Margin="5" HorizontalAlignment="Stretch" VerticalAlignment="Stretch" VerticalContentAlignment="Top" TextWrapping="Wrap" AcceptsReturn="True" />
   </DockPanel>
</Grid>


JSON support in REST data service – Part II

Post the User Post with a JSON Template

In the previous part we used the REST data service to fetch a set of users in JSON format and present them in a list view and as a JSON text string. In this example we call the same service to get related user information and send a request to add new information. The fake online service we use returns a correct JSON response but will not create anything in the database of the service. Smart Office 10.2.1.0.367 HF38 is required.


Mashup_REST_JSON_POST

First we define another data operation to create a user post by sending a JSON request,

<mashup:DataOperation Name="CreateUserPost">
    <mashup:DataParameter Key="REST.BaseAddress" Value="https://jsonplaceholder.typicode.com/posts" />
    <mashup:DataParameter Key="REST.InputJsonTemplate" Value="{StaticResource PostTemplate}" />
    <mashup:DataParameter Key="REST.AcceptHeader" Value="application/json" />
    <mashup:DataParameter Key="REST.HttpMethod" Value="POST" />
    <mashup:DataParameter Key="REST.InputType" Value="json" />
    <mashup:DataParameter Key="REST.OutputType" Value="application/json" />
</mashup:DataOperation>

and we also add a Send button containing an event that collects required values and trigger the CreateUserPost operation.

<Button DockPanel.Dock="Top" HorizontalAlignment="Right" Margin="5" Content="Send">
   <Button.CommandParameter>
            <mashup:Events>
                 <mashup:Event TargetName="PostComment" SourceEventName="Click" TargetEventName="CreateUserPost">
                 <mashup:Parameter TargetKey="title" Value="{Binding ElementName=PostTitle, Path=Text}" />
                 <mashup:Parameter TargetKey="body" Value="{Binding ElementName=PostBody, Path=Text}" />
                 <mashup:Parameter TargetKey="userId" Value="{Binding ElementName=UsersList, Path=CurrentItem[id]}" />
             </mashup:Event>
         </mashup:Events>
    </Button.CommandParameter>
</Button>

A press of the Send button collects the parameters and creates a JSON parameter body to be part of the server request. The body will look like this.

{
   "title": "test",
   "body": "test",
   "userId": "2",
}

Notice that the userId is a string but for the service we call, assume it must be a numeric value. Imagine that we need to customize the body for the service request since the default one will not do the trick.

Let’s create a template for the body that will result in the following JSON.

{
   "title": "test",
   "body": "test",
   "userId": 2,
}

First we add the template as a resource in the Mashup code within a CDATA block.

<Grid.Resources>   
      <x:String x:Key="PostTemplate"><![CDATA[      
               { 
                 "title": "{title}",
                 "body": "{body}",
                 "userId": {userId}
               }
            ]]></x:String>
   </Grid.Resources>

Next step is to add a template reference in the data operation declaration using the InputJsonTemplate parameter .

<mashup:DataOperation Name="CreateUserPost">
    <mashup:DataParameter Key="REST.BaseAddress" Value="https://jsonplaceholder.typicode.com/posts" />
    <mashup:DataParameter Key="REST.InputJsonTemplate" Value="{StaticResource PostTemplate}" />

Done! This is all that is needed to customize the server request body instead of getting the default one generated.

The full Mashup code if you would like to try it out.

<Grid Margin="15,10,15,15" xmlns="http://schemas.microsoft.com/winfx/2006/xaml/presentation" xmlns:x="http://schemas.microsoft.com/winfx/2006/xaml" xmlns:ui="clr-namespace:Mango.UI.Controls;assembly=Mango.UI" xmlns:mashup="clr-namespace:Mango.UI.Services.Mashup;assembly=Mango.UI" xmlns:m3="clr-namespace:MForms.Mashup;assembly=MForms" xmlns:sys="clr-namespace:System;assembly=mscorlib">
	<Grid.RowDefinitions>
		<RowDefinition Height="1*" />
		<RowDefinition Height="10" />
		<RowDefinition Height="1*" />
		<RowDefinition Height="Auto" />
	</Grid.RowDefinitions>
	<Grid.ColumnDefinitions>
		<ColumnDefinition Width="1*" />
		<ColumnDefinition Width="10" />
		<ColumnDefinition Width="1*" />
	</Grid.ColumnDefinitions>
	<Grid.Resources>
		<x:String x:Key="PostTemplate"><![CDATA[		
					{ 
					  "title": "{title}",
					  "body": "{body}",
					  "userId": {userId}
					}
				]]></x:String>
	</Grid.Resources>
	<mashup:DataListPanel Name="UsersList" Grid.Column="0" Grid.Row="0" Grid.RowSpan="3">
		<mashup:DataListPanel.DataService>
			<mashup:DataService Type="REST">
				<mashup:DataService.Operations>
					<mashup:DataOperation Name="List">
						<mashup:DataParameter Key="REST.BaseAddress" Value="https://jsonplaceholder.typicode.com/users/" />
						<mashup:DataParameter Key="REST.OutputType" Value="DataItem" />
						<mashup:DataParameter Key="REST.AcceptHeader" Value="application/json" />
					</mashup:DataOperation>
				</mashup:DataService.Operations>
			</mashup:DataService>
		</mashup:DataListPanel.DataService>
		<mashup:DataListPanel.Events>
			<mashup:Events>
				<mashup:Event SourceEventName="Startup" TargetEventName="List" />
			</mashup:Events>
		</mashup:DataListPanel.Events>
		<ListView Name="ListViewCompany" ItemsSource="{Binding Items}" Style="{DynamicResource styleListView}" ItemContainerStyle="{DynamicResource styleListViewItem}">
			<ListView.View>
				<GridView ColumnHeaderContainerStyle="{DynamicResource styleGridViewColumnHeader}">
					<GridView.Columns>
						<GridViewColumn Header="Company" DisplayMemberBinding="{Binding [company].[name]}" />
						<GridViewColumn Header="City" DisplayMemberBinding="{Binding [address].[city]}" />
						<GridViewColumn Header="Name" DisplayMemberBinding="{Binding [name]}" />
						<GridViewColumn Header="Email" DisplayMemberBinding="{Binding [email]}" />
						<GridViewColumn Header="Longitude" DisplayMemberBinding="{Binding [address].[geo].[lng]}" />
						<GridViewColumn Header="Longitude" DisplayMemberBinding="{Binding [address].[geo].[lng]}" />
					</GridView.Columns>
				</GridView>
			</ListView.View>
		</ListView>
	</mashup:DataListPanel>
	<mashup:DataPanel Grid.Row="0" Grid.Column="2" Grid.RowSpan="3" Name="PostComment">
		<mashup:DataPanel.DataService>
			<mashup:DataService Type="REST">
				<mashup:DataService.Operations>
					<mashup:DataOperation Name="ListUserPost">
						<mashup:DataParameter Key="REST.BaseAddress" Value="https://jsonplaceholder.typicode.com/posts/?userid={userId}" />
						<mashup:DataParameter Key="REST.AcceptHeader" Value="application/json" />
					</mashup:DataOperation>
					<mashup:DataOperation Name="CreateUserPost">
						<mashup:DataParameter Key="REST.BaseAddress" Value="https://jsonplaceholder.typicode.com/posts" />
						<mashup:DataParameter Key="REST.InputJsonTemplate" Value="{StaticResource PostTemplate}" />
						<mashup:DataParameter Key="REST.AcceptHeader" Value="application/json" />
						<mashup:DataParameter Key="REST.HttpMethod" Value="POST" />
						<mashup:DataParameter Key="REST.InputType" Value="json" />
						<mashup:DataParameter Key="REST.OutputType" Value="application/json" />
						<!-- Change to DataItem to use return data -->
					</mashup:DataOperation>
				</mashup:DataService.Operations>
			</mashup:DataService>
		</mashup:DataPanel.DataService>
		<mashup:DataPanel.Events>
			<mashup:Events>
				<mashup:Event SourceEventName="Startup" TargetEventName="List" />				
			</mashup:Events>
		</mashup:DataPanel.Events>
		<Grid Margin="10,0,10,0">
			<Grid.RowDefinitions>
				<RowDefinition Height="Auto" />
				<RowDefinition Height="10" />
				<RowDefinition Height="Auto" />
				<RowDefinition Height="10" />
				<RowDefinition Height="Auto" />
			</Grid.RowDefinitions>
			<DockPanel Grid.Row="0">
				<TextBlock DockPanel.Dock="Left" Text="Post a comment as" Margin="0,0,5,0" />
				<TextBlock DockPanel.Dock="Left" Text="{Binding ElementName=UsersList, Path=CurrentItem[name]}" />
			</DockPanel>
			<DockPanel Grid.Row="2">
				<TextBlock DockPanel.Dock="Top" Text="Title" Margin="5" />
				<TextBox DockPanel.Dock="Top" Name="PostTitle" Margin="5" />
				<TextBlock DockPanel.Dock="Top" Text="Content" Margin="5" />
				<TextBox DockPanel.Dock="Top" Name="PostBody" Margin="5" />
				<Button DockPanel.Dock="Top" HorizontalAlignment="Right" Margin="5" Content="Send">
					<Button.CommandParameter>
						<mashup:Events>
							<mashup:Event TargetName="PostComment" SourceEventName="Click" TargetEventName="CreateUserPost">
								<mashup:Parameter TargetKey="title" Value="{Binding ElementName=PostTitle, Path=Text}" />
								<mashup:Parameter TargetKey="body" Value="{Binding ElementName=PostBody, Path=Text}" />
								<mashup:Parameter TargetKey="userId" Value="{Binding ElementName=UsersList, Path=CurrentItem[id]}" />
							</mashup:Event>
						</mashup:Events>
					</Button.CommandParameter>
				</Button>
			</DockPanel>
			<DockPanel Grid.Row="4">
				<TextBlock DockPanel.Dock="Top" Text="Server Response:" Width="140" Margin="5" VerticalAlignment="Top" HorizontalAlignment="Left" />
				<TextBox Height="120" DockPanel.Dock="Top" Text="{Binding [json]}" Margin="5" HorizontalAlignment="Stretch" VerticalAlignment="Top" VerticalContentAlignment="Top" TextWrapping="Wrap" AcceptsReturn="True" />
			</DockPanel>
		</Grid>
	</mashup:DataPanel>
</Grid>


JSON support in REST data service – Part I

In Smart Office 10.2.1.0.367 HF38 there is support for JSON when calling a REST data service from a Mashup. In this blog post I’m going to use a fake online REST service to demonstrate how it’s done.

The response data from the REST service call can be converted into a DataItem hierarchy or as a JSON string. This example will fetch a listing of users from the service and present them in a Mashup ListView and in a TextBox as a JSON string, side-by-side.

Mashup_REST_JSON_LIST

The Mashup XAML syntax will be the same as before when doing a REST service call. All you need to do now is set the REST.AcceptHeader parameter to application/json.
The REST.OutputType determines if the data response is available to the Mashup as an object hierarchy or as a JSON string. Use the value ‘DataItem’ to get DataItem hierarchy or set ‘application/json’ for a JSON string. If REST.OutputType is not set the default will be a DataItem hierarchy.

<mashup:DataListPanel.DataService>
    <mashup:DataService Type="REST">
        <mashup:DataService.Operations>
            <mashup:DataOperation Name="List">
                <mashup:DataParameter Key="REST.BaseAddress" Value="https://jsonplaceholder.typicode.com/users/" />
                <mashup:DataParameter Key="REST.OutputType" Value="DataItem" />
                <mashup:DataParameter Key="REST.AcceptHeader" Value="application/json" />
            </mashup:DataOperation>
        </mashup:DataService.Operations>
    </mashup:DataService>
</mashup:DataListPanel.DataService>

To set the first column in the ListView to the company name use the binding below.

DisplayMemberBinding="{Binding [company].[name]}"

To access the JSON string when that is set as output type simply bind to ‘json’.

Text="{Binding [json]}"

Here is the complete Mashup code if you would like to try it out.

<Grid Margin="15,10,15,15" xmlns="http://schemas.microsoft.com/winfx/2006/xaml/presentation" xmlns:x="http://schemas.microsoft.com/winfx/2006/xaml" xmlns:ui="clr-namespace:Mango.UI.Controls;assembly=Mango.UI" xmlns:mashup="clr-namespace:Mango.UI.Services.Mashup;assembly=Mango.UI" xmlns:m3="clr-namespace:MForms.Mashup;assembly=MForms" xmlns:sys="clr-namespace:System;assembly=mscorlib">
   <Grid.RowDefinitions>
      <RowDefinition Height="1*" />
   </Grid.RowDefinitions>
   <Grid.ColumnDefinitions>
      <ColumnDefinition Width="1*" />
      <ColumnDefinition Width="10" />
      <ColumnDefinition Width="1*" />
   </Grid.ColumnDefinitions>
   <mashup:DataListPanel DockPanel.Dock="Top" Name="UsersList" Grid.Column="0" Grid.Row="0" Grid.RowSpan="3">
      <mashup:DataListPanel.DataService>
         <mashup:DataService Type="REST">
            <mashup:DataService.Operations>
               <mashup:DataOperation Name="List">
                  <mashup:DataParameter Key="REST.BaseAddress" Value="https://jsonplaceholder.typicode.com/users/" />
                  <mashup:DataParameter Key="REST.OutputType" Value="DataItem" />
                  <mashup:DataParameter Key="REST.AcceptHeader" Value="application/json" />
               </mashup:DataOperation>
            </mashup:DataService.Operations>
         </mashup:DataService>
      </mashup:DataListPanel.DataService>
      <mashup:DataListPanel.Events>
         <mashup:Events>
            <mashup:Event SourceEventName="Startup" TargetEventName="List" />
         </mashup:Events>
      </mashup:DataListPanel.Events>
      <DockPanel LastChildFill="False">
         <ListView DockPanel.Dock="Top" Name="ListViewCompany" ItemsSource="{Binding Items}" Style="{DynamicResource styleListView}" ItemContainerStyle="{DynamicResource styleListViewItem}">
            <ListView.View>
               <GridView ColumnHeaderContainerStyle="{DynamicResource styleGridViewColumnHeader}">
                  <GridView.Columns>
                     <GridViewColumn Header="Company" DisplayMemberBinding="{Binding [company].[name]}" />
                     <GridViewColumn Header="City" DisplayMemberBinding="{Binding [address].[city]}" />
                     <GridViewColumn Header="Name" DisplayMemberBinding="{Binding [name]}" />
                     <GridViewColumn Header="Email" DisplayMemberBinding="{Binding [email]}" />
                     <GridViewColumn Header="Longitude" DisplayMemberBinding="{Binding [address].[geo].[lng]}" />
                     <GridViewColumn Header="Longitude" DisplayMemberBinding="{Binding [address].[geo].[lng]}" />
                  </GridView.Columns>
               </GridView>
            </ListView.View>
         </ListView>
      </DockPanel>
   </mashup:DataListPanel>
   <mashup:DataPanel Grid.Row="0" Grid.Column="2" Name="JsonString">
      <mashup:DataPanel.DataService>
         <mashup:DataService Type="REST">
            <mashup:DataService.Operations>
               <mashup:DataOperation Name="List">
                  <mashup:DataParameter Key="REST.BaseAddress" Value="https://jsonplaceholder.typicode.com/users/" />
                  <mashup:DataParameter Key="REST.AcceptHeader" Value="application/json" />
                  <mashup:DataParameter Key="REST.OutputType" Value="application/json" />
               </mashup:DataOperation>
            </mashup:DataService.Operations>
         </mashup:DataService>
      </mashup:DataPanel.DataService>
      <mashup:DataPanel.Events>
         <mashup:Events>
            <mashup:Event SourceEventName="Startup" TargetEventName="List" />
         </mashup:Events>
      </mashup:DataPanel.Events>
      <Grid Margin="10,0,10,0">
         <TextBox Text="{Binding [json]}" VerticalAlignment="Stretch" HorizontalAlignment="Stretch" AcceptsReturn="True" VerticalContentAlignment="Top" TextWrapping="Wrap" />
      </Grid>
   </mashup:DataPanel>
</Grid>

Mashup Converter with Zero Focus

In Smart Office 10.2.1.0.367 HF 38 there is a new value converter that converts a number to a string label focusing on zero; equals, above or below.

Mashup_Converter_Zero

The default behavior for the value converter is:

value < 0 returns NA
value = 0 returns No
value > 0 returns Yes
otherwise for non numeric input it returns an empty string

 Text="{Binding ElementName=InputValue, Path=Text, Converter={utils:AboveBelowZeroConverter}}"


The return labels for negative, zero and positive values can be customized by adding the ConverterParameter in the data binding containing three strings separated by _ or – characters. If the parameter is incorrect formatted the converter falls back to the default values and logs the issue if the log is in DEBUG mode.

Setting the following ConverterParameter will change the return labels to become Negative, Zero, Positive.

 Text="{Binding ElementName=InputValue, Path=Text, Converter={utils:AboveBelowZeroConverter}, ConverterParameter=Negative_Zero-Positive}"


Here is a the full code for you to try the converter out.

<Grid xmlns="http://schemas.microsoft.com/winfx/2006/xaml/presentation" xmlns:x="http://schemas.microsoft.com/winfx/2006/xaml" xmlns:ui="clr-namespace:Mango.UI.Controls;assembly=Mango.UI" xmlns:mashup="clr-namespace:Mango.UI.Services.Mashup;assembly=Mango.UI" xmlns:utils="clr-namespace:Mango.UI.Services.Mashup;assembly=Mango.UI">
   <Grid.ColumnDefinitions>
      <ColumnDefinition Width="*" />
   </Grid.ColumnDefinitions>
   <Grid.RowDefinitions>
      <RowDefinition Height="Auto" />
      <RowDefinition Height="10" />
      <RowDefinition Height="Auto" />
      <RowDefinition Height="Auto" />
      <RowDefinition Height="*" />
   </Grid.RowDefinitions>
   <TextBlock Grid.Row="0" Text="Test of AboveBelowZeroConverter. Default: Return NA for negative values, No for zero and Yes for positive values, otherwise empty string" Margin="10" />
   <DockPanel Grid.Row="2" Margin="10" LastChildFill="False">
      <TextBlock DockPanel.Dock="Left" Text="Enter a value:" Margin="5" />
      <TextBox DockPanel.Dock="Left" Name="InputValue" Height="24" Width="60" VerticalAlignment="Top" HorizontalAlignment="Stretch" />
      <TextBlock DockPanel.Dock="Left" FontSize="16" Foreground="Green" Text="{Binding ElementName=InputValue, Path=Text, Converter={utils:AboveBelowZeroConverter}}" Margin="5" />
   </DockPanel>
   <DockPanel Grid.Row="3" Margin="10" LastChildFill="False">
      <TextBlock DockPanel.Dock="Top" Text="Custom return value. Set binding 'ConverterParameter=negative zero-positive' (Three strings separated by _ or - character, if invalid converter falls back to default)" Margin="5" />
      <TextBlock DockPanel.Dock="Top" FontSize="16" Foreground="Green" Text="{Binding ElementName=InputValue, Path=Text, Converter={utils:AboveBelowZeroConverter}, ConverterParameter=Negative_Zero-Positive}" Margin="150,5,5,5" />
   </DockPanel>
</Grid>


Calling a REST service from JScript

In this post we will take a look how to consume a REST service from the Smart Office JScript code. Related blog posts that focus on M3 APIs can be found at the following links.
Calling M3 APIs in JScript
Background workers in Smart Office scripts

Setting up the REST Data Service

Let’s start with the script code. It’s necessary to import the following three assemblies to gain access to the necessary classes and interfaces.

import MForms;
import Mango.Core.Services;
import System.ComponentModel;

The first step is to get a handle to the REST data service from the DataServiceManager.

var svc : IDataService = DataServiceManager.Current.Get("REST");

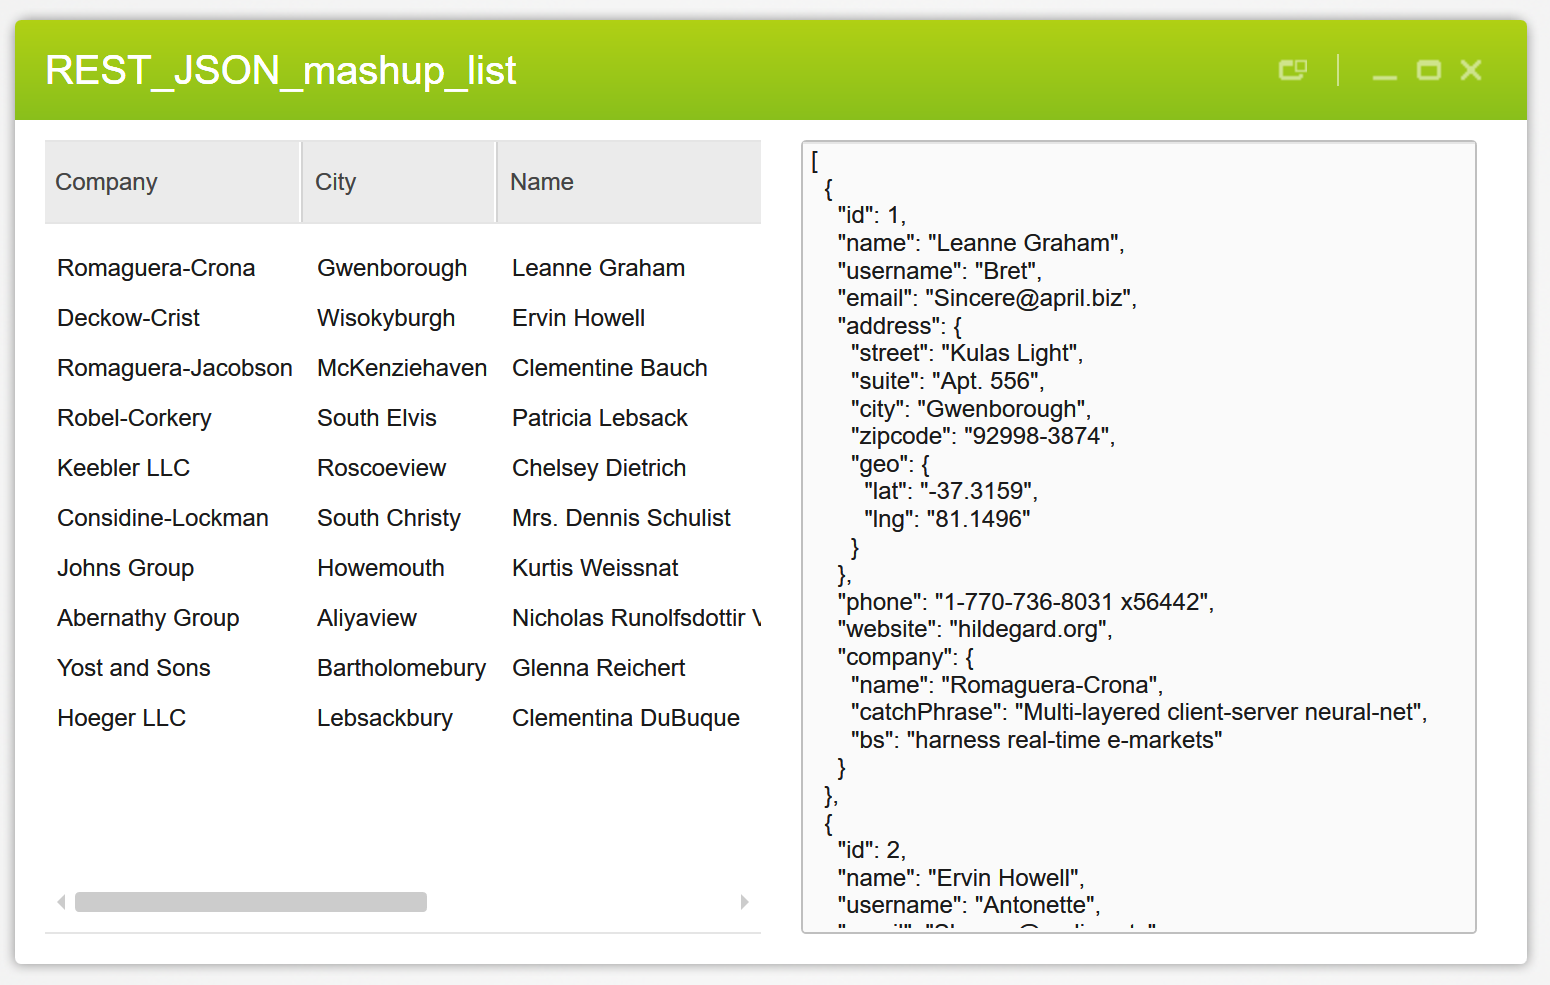
The REST data service is configured with a parameter set put in a DataItemCollection, so we start by setting the service address. I’m going to use a fake online REST service for the example to demonstrate how it’s done.

var params = new DataItemCollection();
params.Add(new DataItem(RestDataService.KeyBaseAddress, "https://jsonplaceholder.typicode.com"));

The available parameters can be found in the RestDataService class, the name starting with Key. It’s necessary to set KeyBaseAddress for the REST requests. KeyUri can contain a relative URI that is combined with KeyBaseAddress. Both parameters support variable substitution using names within curly braces {}. For example:

params.Add(new DataItem(RestDataService.KeyUri, "/users/{userId}"));
params.Add(new DataItem("userId", e.Argument));

or like this. Both will will result in the same endpoint URL.

params.Add(new DataItem(RestDataService.KeyUri, "/users/" + e.Argument));

If the userId variable equals to 7 the combined parameters results in the REST URL:

https://jsonplaceholder.typicode.com/users/7

The service request and response type headers must be specified unless the default values are required. The default values are the following two lines, that can be added for clarity but also omitted.

params.Add(new DataItem(RestDataService.KeyAcceptHeader, RestDataService.ContentTypeApplicationXml));
params.Add(new DataItem(RestDataService.KeyOutputType, RestDataService.OutputTypeDataItem));


Use the Background Worker to Prevent UI Freeze

Now we’re almost done, but the data service require that it’s running on a background thread. If not, it will throw an Exception to make you aware of that. This is done to prevent potential UI freeze and annoyed users. Let’s have a look at a simple solution by using the BackgroundWorker class.

var worker = new BackgroundWorker();
// Set the function that performs the service call
worker.add_DoWork(OnDoWork); 

// Set the function that performs update and clean-up after the call is done        
worker.add_RunWorkerCompleted(OnRunWorkerCompleted); 

// Launch the service call and provide start parameters
worker.RunWorkerAsync(serviceParameters);

The OnDoWork function will execute on the background  thread and call the data service. When done the OnRunWorkerCompleted function will execute on the UI thread to handle the response and do clean up after the call. Please, always handle Exceptions in your code!

public function OnDoWork(sender : Object, e : DoWorkEventArgs) 
{
    try 
    {
       var serviceParameters = e.Argument;
       // The data service call is done here (this is the background thread)
       e.Result = serverResponse
    } 
    catch(ex) 
    {
       // Exceptions must be handled
    }         
}   
public function OnRunWorkerCompleted(sender : Object, e : RunWorkerCompletedEventArgs) 
{
    try 
    {
       var worker = sender;
       worker.remove_DoWork(OnDoWork);
       worker.remove_RunWorkerCompleted(OnRunWorkerCompleted);
       var serviceResponse = e.Result;
       // The worker has completed its work (this is the UI thread) 
    } 
    catch(ex) 
    {
        // Exceptions must be handled 
    } 
}

The Full Script Example

Here is the full script example for you to test in the ISO Script Tool mforms://jscript:

import MForms;
import Mango.Core.Services;
import System.ComponentModel;

package MForms.JScript 
{
   class RESTDemo 
   {
      var debug;
      var controller;     
      public function Init(element: Object, args: Object, controller : Object, debug : Object) 
      {
         this.debug = debug;
         this.controller = controller;        
         debug.WriteLine("Script Initializing.");            
         DoRestCallOnBackgroundWorker();        
      }
    
      public function DoRestCallOnBackgroundWorker()
      { 
         debug.WriteLine("The REST service call is made on a background worker");          
         var worker = new BackgroundWorker();
         worker.add_DoWork(OnDoWork);
         worker.add_RunWorkerCompleted(OnRunWorkerCompleted);
        
         var userId = 7;         
         worker.RunWorkerAsync(userId);
      }
      public function OnDoWork(sender : Object, e : DoWorkEventArgs) 
      {
         try 
         {
            debug.WriteLine("OnDoWork started");
            debug.WriteLine("Calling a REST service getting DataItem response data");

            var svc : IDataService = DataServiceManager.Current.Get("REST");
            var params = new DataItemCollection();
            params.Add(new DataItem(RestDataService.KeyBaseAddress, "https://jsonplaceholder.typicode.com/"));             
            params.Add(new DataItem(RestDataService.KeyUri, "users/{userId}"));                          
            params.Add(new DataItem(RestDataService.KeyAcceptHeader, RestDataService.ContentTypeTextXml)); // default value                                  
            params.Add(new DataItem(RestDataService.KeyOutputType, RestDataService.OutputTypeDataItem));   // default value
            params.Add(new DataItem("userId", e.Argument)); 
            
            var dataRequest = new DataRequest(params);
            dataRequest.OperationType = "GET";
            var dataResponse = svc.Execute(dataRequest.OperationType, dataRequest);
            e.Result = dataResponse.Data;            
            debug.WriteLine("OnDoWork done");    
         } 
         catch(ex) 
         {
           debug.WriteLine("Exception: " + ex.Message);
           e.Result = null;
         }         
      }
      public function OnRunWorkerCompleted(sender : Object, e : RunWorkerCompletedEventArgs) 
      {
         try 
         {
            debug.WriteLine("OnRunWorkerCompleted running on UI thread");    
            var worker = sender; 
            worker.remove_DoWork(OnDoWork);
            worker.remove_RunWorkerCompleted(OnRunWorkerCompleted);
            if(e.Error != null) 
            {
               debug.WriteLine("Error: " + e.Error.Message); 
               return;
            }
            debug.WriteLine("Fetched user data for:");           
            var dataItem = e.Result;
            debug.WriteLine(dataItem["name"] + " (" + dataItem["username"] + ")" + " Phone " + dataItem["phone"]);  
         } 
         catch(ex) 
         {
            debug.WriteLine("Exception: " + ex.Message);
         }
      }
   }
}


Debug output when running the sample in the Script Tool.

Script Initializing.
The REST service call is made on a background worker
OnDoWork started
Calling a REST service getting DataItem response data
OnDoWork done
OnRunWorkerCompleted running on UI thread
Fetched user data for:
Kurtis Weissnat (Elwyn.Skiles) Phone 210.067.6132

Recent enhancements to Infor Smart Office for Lawson applications

With each 10.2.1.x hotfix for Smart Office, in addition to fixes of reported issues, many enhancements have also been included.  And with each release, we update the Knowledgebase article that summarizes those changes (KB-1626878). This post will provide some more detail about the enhancements included over the second half of 2018 and those so far in 2019.

10.2.1.0.329 (HF31)

1) A new user setting (Toolbox width on the Advanced tab) allows for a wider presentation of the forms and lists toolbox area.

2) In addition to the width setting, there is now also a setting to allow the toolbox to be locked in the open or displayed position.

Toolbox

3) Alpha filter fields on lists have always defaulted to a ‘Starts with’ comparison, but a new application setting (Default alpha search type – set in the Settings Editor for S3.Client) allows an administrator to change the default to ‘Contains’.

AlphaFilter

10.2.1.0.333 (HF32)

1) On the Actions menu of standard forms, there is now a menu item to launch the list view for forms that support it.

LaunchVendorList

2) Three enhancements were made to the Script tool: a) the help menu links to the Microsoft .NET reference; b) some common .NET event handler helpers were added; and c) the search providers were added to the context menu.


10.2.1.0.341 (HF33)

1)  Three new methods were added to the supported scripting model (as documented in the Object Browser): IForm GetFieldByNumer and IField Get/SetAttribute.

2) Before publishing a script file to the server, it is now scanned for non-ASCII characters which might cause subsequent compilations to fail. These characters might be introduced by writing script in another editor and pasting to the Script tool.

ScriptTool

3) A search feature was added to the Personalization Manager which allows an administrator the ability to find form and list personalizations by token as well as finding references to Jscript files.

LawsonPersonalizationManager


10.2.1.0.351 (HF34)

1) In addition to several minor enhancements, two major personalization enhancements for standard forms were introduced: the ability to display hidden fields and the ability to move standard elements. These are both described in greater details in this post: New Personalization features for Infor Smart Office for Lawson.

10.2.1.0.353 (HF35)

1)  A search feature was added to the Object Browser for help in locating property and method documentation and sample code.

SearchObjectBrowser

10.2.1.0.359 (HF36)

Note: this hot fix has been pulled due to the introduction of a serious regression in the M3 client. Since hotfixes are cumulative, the enhancements listed here are included in hot fix 37

1)  Infor Browser calculated fields can now be used as an operand for another calculated field.

2) A Lawson System Check utility is available to administrators to examine various settings and provide recommended changes, if any.

3) Three new scripting enhancements were added: two methods added to ControlsUtil (AddCustomTextBlock and AddCustomGroupLine); and constant for setting element foreground colors to the selected theme color (ScriptConstants.ThemeBrush).

4) The net://auth protocol is intended only to support Lawson web content and since the only version of Internet Explorer now supported by Lawson is IE 11, if the user’s browser emulation is not set to IE 11 with the net application is launched, a warning will be displayed. Administrators should consider locking the browser emulation application setting in the Settings Editor.

WebBrowserEmulation

10.2.1.0.361 (HF37)

1)  Two scripting enhancement were added to the supported scripting model (as documented in the Object Browser): an IField event, FieldValueChanged and the static class, HotkeyActions, which documents hotkey action names.

2) A new Profile setting in the SmartClient section of the Profile Editor (LogonBannerUrl) allows administrators to specify the URL of custom content to display in a browser control as users logon.

LogonBannerUrl

Smart Office commands cheat sheet

Smart Office has a number of commands, or in fact they are all links that will perform an action like opening a tool or clearing a cache. A special thanks to Jarda Dedek at EYELEVEL for sending me the original list. I took it and added a few tips of my own. In Smart Office every application is launched by an Uri. The Uri consists of a schema, like http and https, but we use mforms, sforms etc to identify different applications. As it turns out the short form links: is also a valid Uri, it’s just that it has no path, just the schema.

Download PDF version

Command Description
mforms://cmp600 Company switch
mforms://cmp100200 Division switch
mforms://lngcz Language switch
mforms://mitest MI Test
mforms://_command?value=clear cache Clear language and view definition cache. (No other caches) The reply from the command will show what caches have been cleared.
mforms://_command?value=clear view Clear view
mforms://_command?value=clear view all Clear all views
mforms://_command?value=clear lngcache Clear language cache
mforms://_command/?value=clear custcache Clear customization cashes in UI Adapter
mforms://jscript Script Tool
mforms://jscript/clear Clearing jScript cache with confirmation
mforms://jscript/clear&silent Clearing jScript cache without confirmation
mforms://_automation?template=<TEMPLATE NAME>&<NAME1>=<VALUE2>&<NAMEn>=<VALUEn> Automation links crated in Automation builder
mforms://_automation/?data=<AUTOMATION XML>  Automation link with automation file uploaded to server
admin://file/category Category File Administration
admin://importexportmanager Import/Export Manger
admin://installpointmnanager Install Point Manager
admin://predefinedwidgets Predefined Widgets
admin://profileeditor Profile Editor
admin://settingseditor Settings Editor
admin://userhistory User Logon History
admin://videosmanager Videos Manager
startpad://manager StartPad Manager
admin://file/category?category=StartPad StartPad File Administration – Start pad
admin://file/category?category=Mashup StartPad File Administration – Mashup
links: Link Manager
dev:help List of development commands
dev:icons Show icons
dev:local Show local folder
dev:localscriptpath Show local script path
dev:log Shows log
dev:supportzip Creates a zip with the log file and some other files like settings
dev:roaming Shows roaming folder
dev:root Shows root folder
dev:bin Shows bin folder
dev:user Shows local folder with user profile. All U** in S0 folder then can be deleted to refresh views/starting_values/user_data.
C:\Users\jarded\AppData\Local\Apps\2.0\
dev:server Show server folder
dev:shared Shows share folder
dev:resetlang Resets language
internal://log Smart office Log viewer
internal://log?search=idledetect Add a free-text search parameter to start with all entries matching the search criteria, in this example all entries related to user idle detection.
internal://log?search=idledetect&session=2

internal://log?search=idledetect&session=last

internal://log?search=idledetect&session=prev

This can be extended with the session parameter to specify the initial session to select in the log. It can be a value [1..n], last will select the current session, prev will select the previous session and full selects the whole log file. Previous is useful if you examine something that happens during shutdown and you examine the log after a restart.
internal://log?cat=service unavailable
internal://log?cat=service%20unavailable
internal://log?cat=service unavailable&session=full
You can specify the category you defined as initial selection.


internal://log?search=idledetect&sessiontime=13:10 The session time parameter that may be useful in some special cases and if the session time parameter is present the session parameter is ignored.
internal://themeulator Canvas theme Emulator
tool://wstest Web services test tool
widget: Opens the widget library
widget://add/?scheme=Mango.Widgets.MenuWidget Adds a widget to the canvas, use the widget ID to specify which widget to add.


M3 TechEd – Reporting capabilities

I took the opportunity to leave the hands-on lab and watched Mike Fletcher’s session on Reporting capabilities within Infor M3. He started off showing Homepages, and how to use it to present operational metrics, analyzing current data from M3. The session presented a number of other techniques as well.

F4DC1C6C-3C17-4C94-9622-9FC8E14252E5

An example is to show a monitor, with the count of stopped orders, and then being able to go to the list from the Monitor Widget.

Another example was to show items under development without prices by using search. The query was built by selecting “add to search” from the context menu on the column header. The search query can then be added to a menu in Homepages so that you have a link to the tasks that you work with on a regular basis.

In business context and context applications are also a form of reporting that can provide context information to M3 data, including Birst reports, Infor Document Management documents, as well as H5 Mashup applications as Context Applications.

A great session that give business context to the development that I’ve been working on. It is always nice to see how powerful the different widgets, SDKs and H5 are from a business perspective.

I also got some good feedback from customers and partners which is really what TechEd is all about, learning from each other.

M3 TechEd – Day 2

Today is day 2 at M3 TechEd. We started with Infor OS and Heath on the main stage. Infor OS is great and will give you a lot of value. If you want to learn all about Infor OS don’t miss the coming TechEd in Las Vegas in February.

C772F287-2EB2-44A9-839C-1A6FE11CDED1

Heath started with Infor OS and a quick overview.

CE542FE8-0EE1-4B96-A396-219DB68E5E1D

Infor Document Management is a living repository for collaborating around documents.

Next on stage was Torbjörn on User Experience starting with Homepages the application that is built for role based, highly configurable widgets presenting a process based view, highlighting those items you need to take action on.

94DA5E14-864C-41D2-9475-CF5658E83FF7.jpeg

Then there was a great session on organization change management by Carol Tyler and how we at Infor is transforming the industry and cultivating our culture of innovation.

Yesterday I arrived early, in the dark, and I left, in the dark. That’s just how it is in December in Stockholm. Today I was half an hour later, just in time to catch the sunrise.


Beautiful sunrise facing Gröna Lund and Djurgården, on the other side.